Mediacurrent has made a commitment to work with the Drupal community to help maintain and improve modules for the leading Marketing Automation services. In this tutorial, we will show you how to set up the newly upgraded Pardot (a Salesforce Company) module.
Let’s take a look at features that are available in the this latest release of the Pardot module.
- Web page tracking
- Campaign tracking
- Custom scoring
- Webform lead integration
Getting Started
Our goal for this module was to make it as easy as possible to configure for Pardot customers. With minimal setup administrators can enable key features of Pardot, including webform integration and page tracking.
HOW TO ADD WEB TRACKING
1. The very first thing you do is enable the Pardot module from /admin/modules.
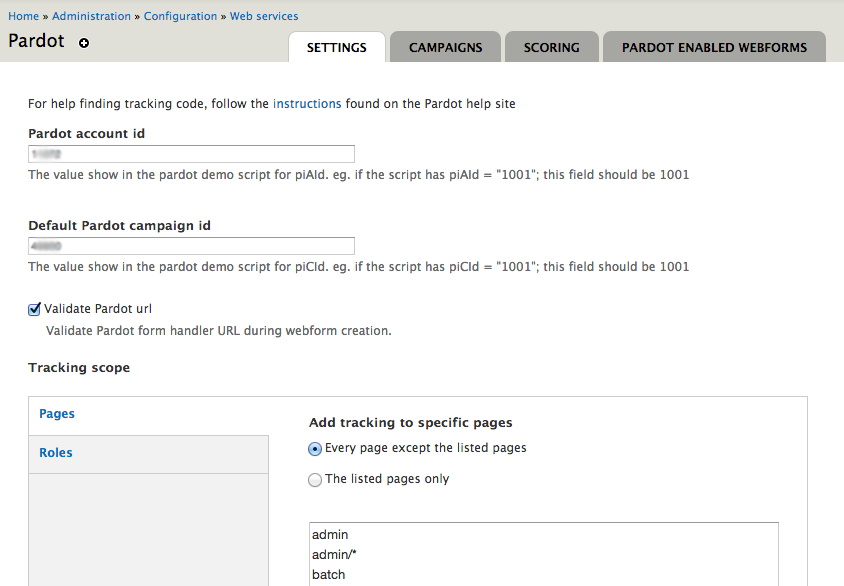
2. Next you will go to the settings page at /admin/configure/services/pardot to plug in a couple of important values Drupal needs to know to point to Pardot.

3. The Pardot module needs 2 values to supply to the javascript tracking code, the account id, aka piAId and the campaign id, aka piCId. If you have copied the embed code before, these values are found in that embed code. Rather that go through the specific instructions here on how to find those values, we will refer you to the Pardot website if you need help:
https://www.pardot.com/faqs/campaigns/tracking-code/
4. The 3rd setting you will see on this page is an option to ‘Validate Pardot url’. We recommend you leave this option enabled. This will check the url you configure for each webform to make sure it is a valid url.
5. The next item you will see is an area to control where the visitor tracking script gets enabled. This is one big benefit of using this module over just pasting in the embed yourself. By default you will need many pages already exclude the tracking script (administrative pages for example). If you don’t know what to do here, it’s recommended you leave the default settings.
6. Once you have configured these options click the save button below.
That’s all you have to do! Now your website has visitor tracking enabled.
HOW TO CONFIGURE CAMPAIGNS
Now that you have page tracking enabled, you might also like to control which campaigns get triggered on certain pages.
1. Click on the ‘Campaigns’ tab from the main settings page.

2. You will need 3 values to configure a campaign, ‘Campaign ID’, ‘Campaign name’ and ‘Path’.
3. Just like you configured a default campaign using the piCId, you will get a numeric value for each Campaign you configure in Pardot.
4. Next, add a ‘Campaign name’, this is just for reference.
5. Finally, add a list of paths using Drupal’s visibility syntax. For example if you want a specific campaign for all of your blog pages you would enter in ‘blog/*’ in this setting.
Click the ‘Add’ button and you have created a campaign setting. You can edit these settings at any time.
HOW TO SET UP CUSTOM SCORING
Another important feature of Pardot is being able to assign custom scoring to a specific page. Suppose for example, you want to increase the score of a lead when they visit a whitepaper page. This is where you would configure that feature.
1. Click on the ‘Scoring’ tab from the main settings page.

2. You will need to enter 2 values on this page, ‘Path’ and ‘Score.’ One limitation of this feature is that the path can only accept a single path at this time. We do have a ticket open to improve this feature.
Click the ‘Add’ button and then you are done. Add as many custom scoring settings as you need.
HOW TO ADD WEBFORM / LEAD INTEGRATION
As is the case with many Marketing Automation services, Pardot allows you to build lead forms that you can embed in a Drupal website. The problem is from a branding perspective, the form isn’t always easy to theme and can look out of place. It’s much more advantageous to use the popular Drupal Webform module to build out your form and then just map it to a Pardot form handler. The following instructions will help you set this up.
1. Pardot webform functionality is already enabled by default when you enable the Pardot module. Note that future versions will require you to enable a ‘Pardot Webform’ submodule.
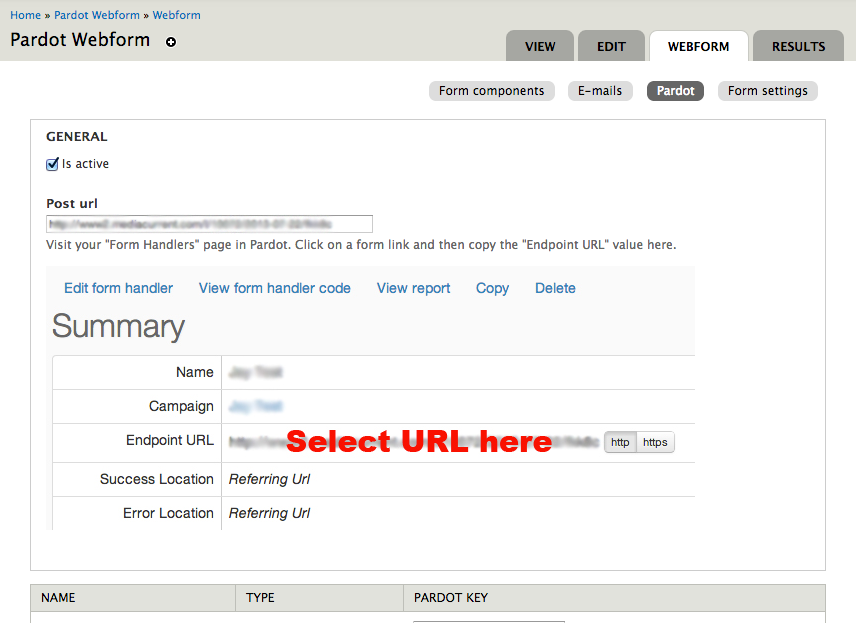
2. Assuming you are already comfortable setting up webforms, first go to the ‘Webform tabs' of your form to see the ‘Pardot’ configuration ‘sub-tab’. Click on that tab.

3. The first setting you will need to find is the ‘Post url’ of your form handler. This assumes you have configured a form handler in Pardot. The ‘Endpoint URL’ in Pardot is what you will need to map it to this form.
4. Next you will map your Pardot keys to your webform components. This is important as otherwise your leads will come up blank or not at all.
5. After you have assigned keys to all of the fields you want mapped to Pardot, click save and you are done!

Whenever someone submits this webform the data will also be sent to Pardot. The webform module allows you to do many things outside of Pardot (archive submissions, send email notifications, etc.). With this module, you can set up several webforms and have each of them matching to a different form handler.
Feedback
As we continue to collaborate with Pardot and the Drupal community on new features that this module can include, we would also like to hear what interests you. What features would you like to see in upcoming releases of the Pardot module?
