Amaze your friends and co-workers with your cool animated gif screencasts!
A picture is worth a thousand words. It’s a tired cliché but it’s generally true. Sometimes it’s easier to show someone a thing than it is to explain that thing using the written word. Working with a distributed team has it’s share of challenges and one is explaining how to reproduce a bug or how a new feature should work. What if you could quickly record a video and paste it into a your ticketing system? And by quickly I mean seconds, not minutes.

We are all familiar with animated gifs. They’re a lot of fun. They can also be useful when doing dev and design work. This tutorial will show you how to create an animated gif screencast. Let’s begin by breaking this down into 3 steps.
- Create the gif
- Upload the gif to the web
- Share your gif!
Create the Gif
Most tools for creating animated gifs are designed to convert a movie snippet into a gif. We want to capture our screen as an animated gif. The best tool I’ve found for doing is an app called LICEcap. Horrible name but it’s a great free and open source (Mac / Windows) app that is easy to use.

Upload the gif to the web
Once we have our gif we want to be able to quickly share it. The goal is to quickly upload the file and copy a publicly shareable URL. What I’ve done is set up a directory on my own server to store my gifs but you could use any number of file sharing services. I recommend Cloud App or Dropbox.
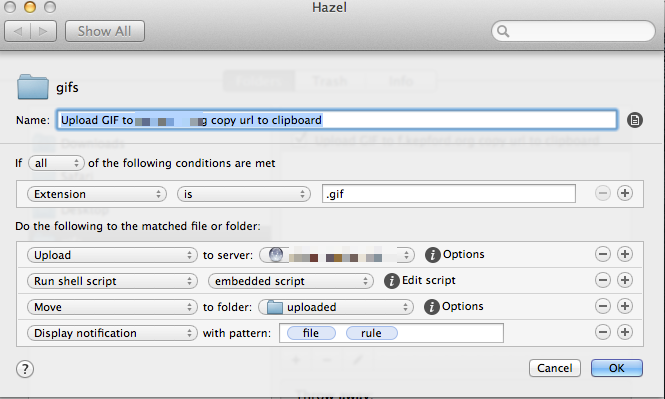
If you are a Mac user there is a great little app called Hazel (paid app) that does many cool things. At it’s core it’s a daemon that waits for triggers to launch it into action. It’s like a little digital worker on your computer. My favorite thing that is does is watch a directory for changes. When a new file hits a watched directory it jumps into action and does whatever you set it to do. In this case I want Hazel to execute a script that uploads the Gif file to my personal server. This script then copies the gif URL to my clipboard and then moves this file to a folder named uploaded. So, all that I have to do is move the file to a folder named Gifs and within seconds I have a shareable URL on the clipboard.
This simple shell script copies the URL to the clipboard.
x="$1" y=${x%}
echo http://mydomain.com/${y##*/} | pbcopy
Share your gif!
Now that I have a URL for the gif on my clipboard I’m ready to share it. Where I am sharing the gif will determine how I proceed. If the system supports the image tag I use a TextExpander snippet to quickly drop an image tag into my comment body. So the next time you have to explain a complex bit of functionality, why not spend that time making an animated gif that demonstrates what you are trying to explain.

Additional apps to consider