When thinking about your digital marketing strategy, using the tools available can make the difference between having a clear roadmap of opportunities to improve your site and feeling lost on where to start.
Website optimization tools like Siteimprove can provide deep insight into your website analytics and make the decision making process for your strategy easier in many ways. You can use Siteimprove to do many things, including:
- Check site performance
- Manage how conversions are doing
- Measure progress against KPIs with visual dashboards
- Gain insight into SEO opportunities
- Improve accessibility compliance
- Get a roadmap to prioritize improvement efforts
All of this and more is available in Siteimprove to guide you on how to make your site even better.
Top Tips to Set Up Siteimprove
Here are some of our top tips for configuring Siteimprove in an effective way to transform your strategy into a workable roadmap for your site.
1. Assign Permissions
To make the most of your experience with Siteimprove, make sure your team has the right permissions to follow through with the tasks you hope they will achieve.
An Account Owner is typically the person who can set permissions for the team. Here are all of the permissions available to set up in Siteimprove:
- Account Owner - All view and action permissions.
- Administrator - All view permissions and most action permissions.
- User - All view permissions and action permissions, but no access to settings.
- Read Only - A Read-only user has only view permissions and no action permissions.
- Report Recipient - A Report Recipient has no view or action permissions.
For the Mediacurrent team, it has been especially helpful for some users to only access Siteimprove at the user level, such as strategists and project managers who need access to the data but have less of a need to change settings.
As we use it for our own site, however, we have moved some team members, such as members of the marketing team, into Administrator roles to better coordinate with the Siteimprove support team on how to best organize the account.
Team members in the Administrator role, for instance, are able to access certain options such as rescanning a site more frequently, which is not available at the other tiers. Having a better understanding of how permissions are set up can help your team achieve its goals faster.
The Siteimprove Help Center offers more detailed information about each user level and its permissions, so the more you know about what roles your users have, the better you can give them the access they need to make a difference.
2. Create Policies
A website can grow to have hundreds if not thousands of pages, and when multiple content creators are adding/editing these pages, how can you make sure content is consistent across the site? A Siteimprove policy can help!
Setting a policy in Siteimprove ensures that content created on your site meets specific policies and flags any issues that content editors can fix.
For instance, a standard for accessibility includes avoiding link text that has no context around it. You may decide to create a policy related to this standard by flagging any text that says "Read more" or "Click here.”
An example of a policy we have that helps content editors is to flag instances where a word is repeated in succession. While content often has many people revising and proofreading it, we’re all humans with many tasks on our plate, and things can get overlooked. A policy like this allows us to review content again to make sure the content is easy to understand.
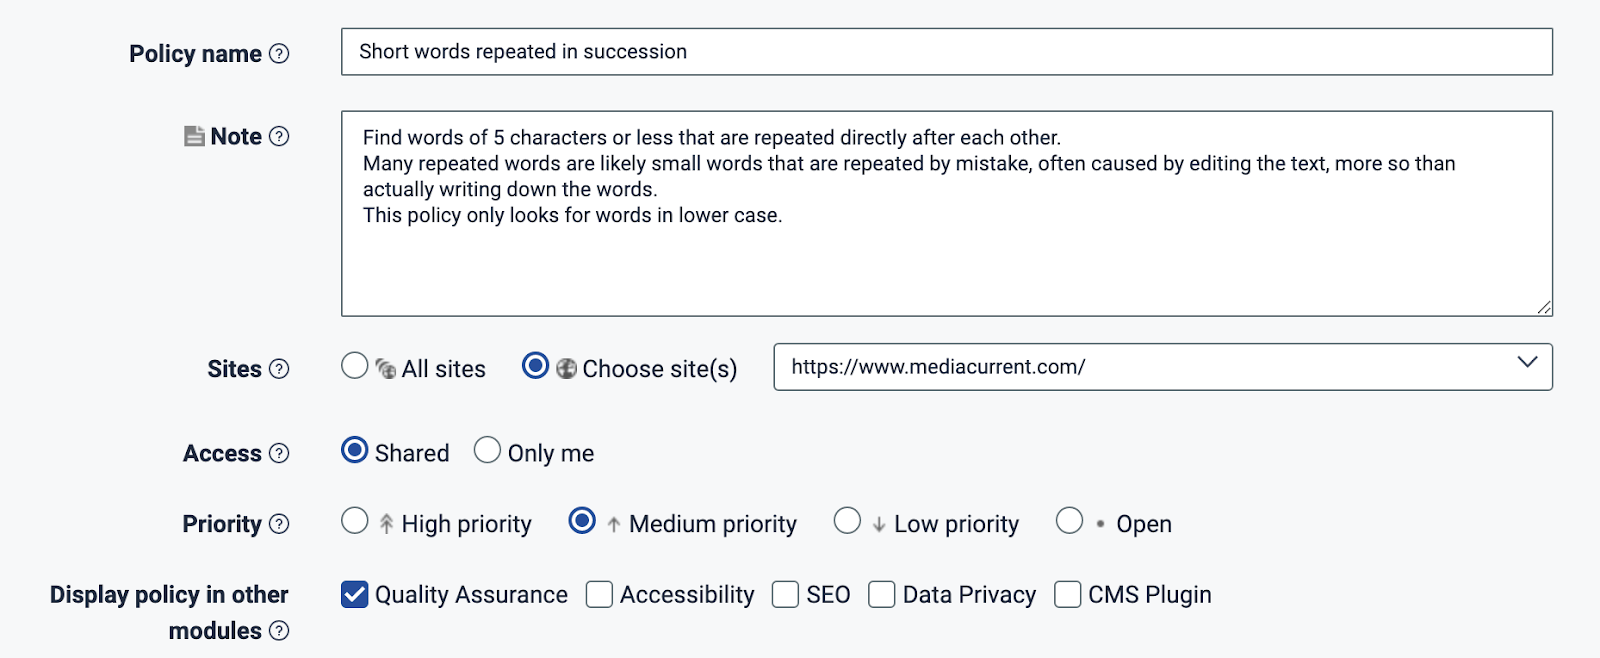
Example policy in Siteimprove
Take a look at examples of Siteimprove policies for more ideas on how to configure your account’s policies to help in the content production process.
3. Install Drupal Module
Using Drupal as your site’s CMS? You can experience the advantages of using the Siteimprove Drupal module!
The Siteimprove Drupal module provides several helpful features for content editors actively updating content such as:
- Quick access to Siteimprove in site’s back end: Rather than having to access the Siteimprove dashboard in your browser, you can access much of the same data you would see, right in the Siteimprove CMS Add-On in the back end of your site.
- Pre-publish checks: Check pages before you hit “publish” with direct insights in the module that give ideas for suggested changes that can make the page better.
Discover site impact of unpublishing content: Save your team from regretting the loss of high-impact content with tools built into the module to provide insight and context about the page’s SEO or potential for broken links.
4. Check Broken Outbound Links
Every site is unique, so you may come across issues you were not aware of, such as broken links on your site that link to resources on other sites. We experienced this with our links to Drupal.org, as Siteimprove thought each of these links was a 403 error. However, the links were valid links once we clicked through them, generating a “false positive” in the software and hurting our scores overall. This is the kind of configuration that needs to be done to show improvement and quickly minimize the list of necessary fixes.
By working with the dashboard and the Siteimprove support team, we were able to bulk update our settings so that any link to Drupal.org was ignored, which allowed the number of broken links to decrease sharply.
Taking this step allowed us to better understand the configurations in Siteimprove and customize them for our own needs.
5. Turn On Universal Search
Does your site have to meet certain compliance requirements? Turning the Universal Search function on in Siteimprove can help you track down terminology that needs to be updated. In the case of regulations like GDPR, names that need to be removed as part of the “right to be forgotten” component of the law, so that your content stays current.
Keeping on top of your content is easier thanks to tools like Siteimprove’s Universal Search!
6. Turn on PDF Accessibility Checker
Oftentimes PDFs are generated as flat image files and cannot be accessed via assistive tech, but you may not be aware of this unless you use this kind of tech on a regular basis. Siteimprove can help with an automated check on PDF files to ensure they are structured in a way that is accessible for these users.
PDF accessibility can be important for many verticals such as government, healthcare, and higher education. In order to create a PDF that has content accessible to everyone, you have to make sure the content can be accessed with assistive technology such as a screen reader.
You can activate Siteimprove’s PDF accessibility checker to quickly see which PDFs may need additional revisions to be accessible for all audiences, especially those users who access these resources using assistive technology such as screen readers.
7. Configure Reports
Once goals are set and Siteimprove is properly configured, you can set up reports to email weekly, monthly, or quarterly for different parties like marketing or leadership.
There are several types of reports available which provide different levels of data, from reports on how accessibility is doing to general Quality Assurance reports that check things like the number of pages created, new broken links from week to week, and new misspellings that may have occurred since the last crawl. Reports can also be sent as PDFs or HTML files for the team to review.
Our team has gained a lot of valuable knowledge about our progress through the Quality Assurance reports. We have been able to see measurable changes over time and use the information to increase all of our scores.
Learn more about reports in Siteimprove from the reports support page.
How Siteimprove Transformed the Mediacurrent Site
When we implemented Siteimprove, we already had an accessibility initiative underway to move our site closer to Level AA Web Content Accessibility Guidelines (WCAG) standards. We compared our existing audit with real-time findings in the Siteimprove dashboard and took additional steps to move our scores up. Developers took on a lead role in introducing these changes in a staging environment, then pushing them to a live, public environment.
We also noticed some low-hanging fruit with regards to changing our Quality Assurance and SEO scores. Siteimprove flagged issues we had not been aware of not considered such as missing meta titles or empty H1 tags. Content editors took on many of these changes, with our QA team providing support to ensure nothing was missed.
The result of our work? We have achieved a Digital Certainty Index (DCI) of 90.5 out of 100 in less than 3 months, which reflects our average score across SEO, Accessibility, and Quality Assurance scores.

Progress of improving the Mediacurrent site in Siteimprove
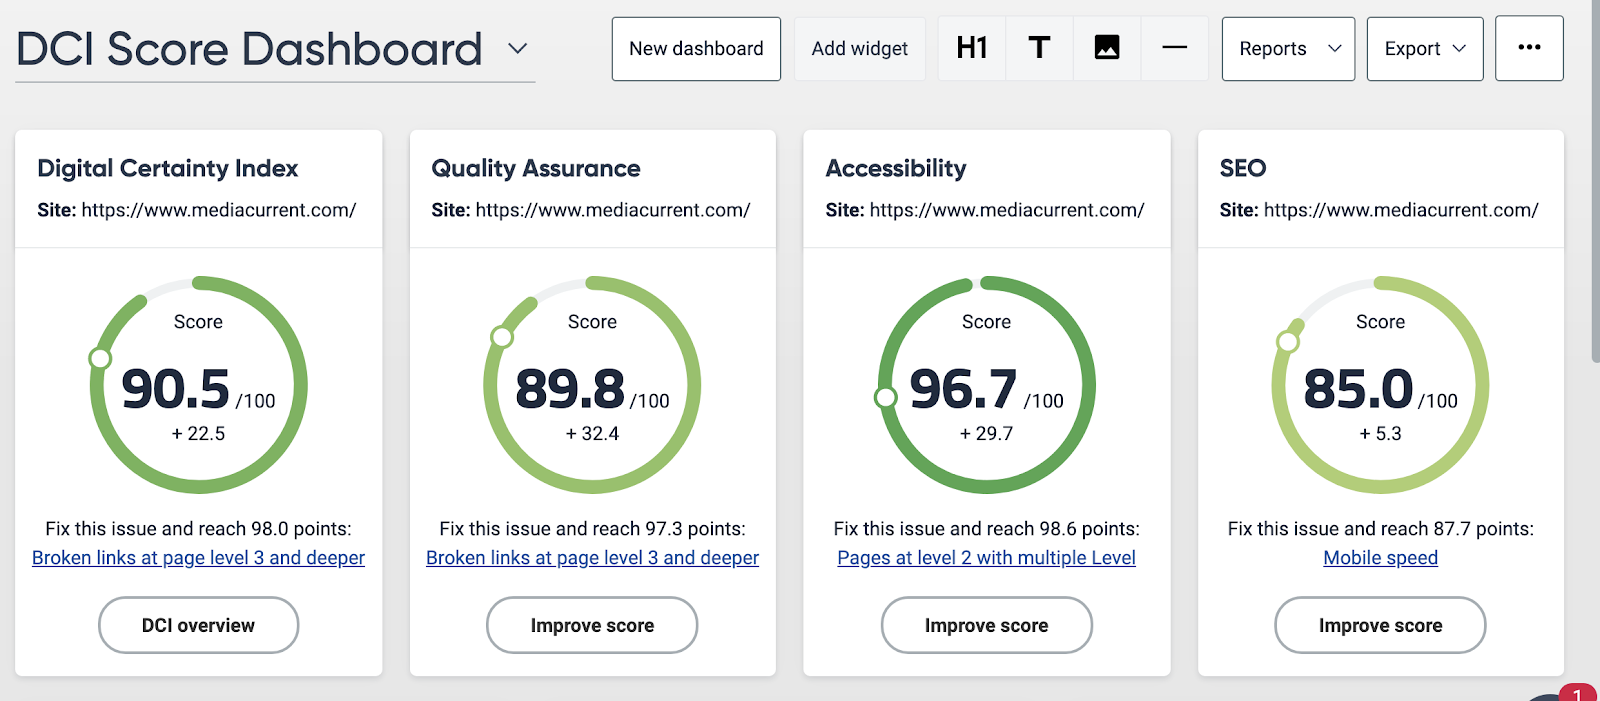
Main Digital Certainty Index (DCI) dashboard in Siteimprove
Explore How Siteimprove Can Help You
While the data Siteimprove provides is interesting in and of itself, the true power in this tool comes from the ability to customize how this data is processed to see how it impacts your business's goals. However, we understand that configuring your account and interpreting the data that flows in can be time-consuming and frustrating.
Our team of Siteimprove certified experts can apply our knowledge to configuring your dashboards and making sense of the data. Learn how a Siteimprove tune up can improve your account and make better use of the information in Siteimprove to improve decision making.